Saturday, March 22, 2014

Dovetailing 101- failure is always an option

For a long time now, I've been wanting to try to cut dovetails by hand.  I've watched several videos on how to do it and felt like I should be able to do it.  I started out by practicing straight cuts in the end grain of a piece of scrap pine.   
Once I did that I layed out the tails on a piece of poplar I had laying around. I started cutting the dovetails in the waste side of the tail.

One thing I really need is a vice of some sort to be able to better hold workpieces. These clamps just don't cut it
Next Istep was to cut out the waste with a coping saw. I had bought one several years ago and it's had a lot of use....collecting dust in my tool cabinet.  
It actually cuts great...


After that I got out my chisels to clean up the cuts.  I think this May have been where I screwed up at least the first one...I tried to cut the ends and the tails and I think I got to aggressive, plus my chisels needed to be sharpened so some of the grain tore out while I was trying to pare away a small amount of material. 

I transferred the tail locations onto the pin board.  

After I cleaned up the waste, this was the result.


Failure is always an option.  I'm going to sharpen my chisels and try it again to see if I can get a better result next time.

Monday, March 10, 2014

Intro to Scrollsawing

We had an unusual weeknight with nothing scheduled to do so I asked Braden what he wanted to do and he said he wanted to make something in my shop so we went down and started planning what he wanted.  He said he wanted to draw and cut out a Pokemon so that's what we did....well at least started.  He found one he liked so we took a piece of paper and traced the shape out over top of my iPad.  The printer still isn't hooked up after the desk building.   We used spray adhesive to stick it to a piece of 1/4" plywood and started our scrollsaw lesson.  This is the first time Braden has used the scrollsaw so we talked about safety and shop safety first, but soon started cutting.  


We got this much done tonight. We stopped after about 20 minutes because his attention span had run out and he was ready to play Pokemon a little while before bed.  We'll finish it another day...or not, just whatever he wants to do.  


Sunday, March 2, 2014

Craft/Computer Desk Finale!

Today started out by destroying my old computer desk which was falling apart to make room for the new desk in the office.  It was particleboard crap so no real loss.  We then moved Leslie's old computer desk over to my side of the office for me to use.  Leslie helped me move all the pieces upstairs this afternoon. Here is a shot of beginning the re-assembly. 


The assembly process was pretty straight forward just getting everything in place and lined up was just a little tedious.  And or the big question of whether the top would fit...it was a non-issue. Went up without a hitch. Here is the proof...


Otis also was close by to lend a haw to the re-assembly. 


And Braden had to do the quality testing of the desk strength.   


And for the final result....this desk looked big downstairs, but now fully installed, it looks huge in the office, but Leslie is happy with it and that's all that really matters.  Here is the finished project


Now I have to figure out what I want to build next...

Sunday, February 23, 2014

Craft/Computer Desk Day 7

Not many pictures today.  Pretty boring stuff really.  I started by sanding the joint compound and then cleaning up all the nasty dust.  Then I wiped everything done with a tack cloth.  I applied two coats of paint to the shelves and and two coats of shellac to the pine edging.  Here's the results.  


Next time it will be time to drag all the stuff upstairs and complete the assembly of the desk.  I'm sure Leslie will be thrilled to have it...and it's only taken a couple of months to complete.  I think that might be a record.   


Saturday, February 22, 2014

Craft/Computer Desk Day 6

Today started with shop cleanup since I haven't had a chance to do it in the evenings this week.  I had bought a trash can dust collection separator from WoodCraft a couple of years ago but I never knew how effective it really was. I had completely emptied it and my Grizzley dust collected right before I had started on Leslie's desk. After sweeping and vacuuming up all the dust I checked the can and it was completely full but the dust collector was almost empty.  If you don't have one I highly recommend this Trash can lid separator.  It's cheap and effective!


After I got the shop cleaned up I started breaking down the desk to get it ready for paint.    


I had to use every flat surface I could find to stage the parts so I can get this done as efficiently as possible tomorrow.  

After getting set up I started filling the visible pocket hole screw holes with just regular dry wall compound.  I found this worked well on Leslie's bookcases so I did it here too. This is easy to sand and clean up when it dries. It's kinda messy to start with....

But with a coat of paint you'll never see it after it's sanded.  

Speaking of sanding, I started sanding the edging to smooth it up, but my sander started making an awful noise and then the sanding disc just flew off.  This is the second disc I've gone thru.  I bought this replacement disc from Highland Woodworking, but it didn't last very long at all.   

I guess it's time for an upgrade.  I've had this one for probably 15 years so it was due.  I want one with better dust collection anyway.  This one spews dust like there is no tomorrow.  I finished sanding the pieces by hand with the disc.  It does make a good sanding block.

Well.that was my day in the shop today.  I'll sand all the joint compound and then wipe everything down and get a coat of paint applied.  Hopefully it will only need 2 coats total.  

Sunday, February 16, 2014

Craft/Computer Desk Day 5

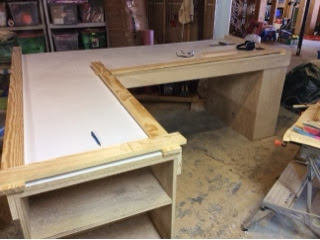
This weekend I started the final true woodworking steps for the desk...ie the fun part. I started by rough cutting the pine edging to length and width.  Note that I didn't make any edging for the back edge because it will be up against a wall so it wouldn't be seen anyway.

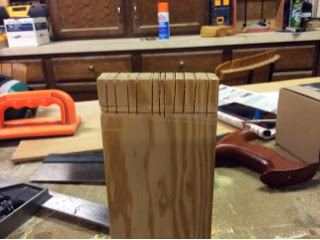
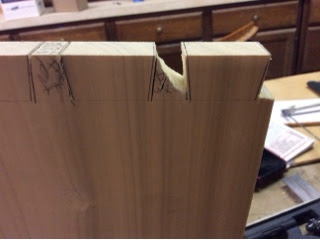
After I got the edging rough cut, I started getting into paralysis by over analysis mode....to miter or not to miter that was the question.  I had originally planned to miter the corners so but when I cut some scrap pieces to test the fit it didn't really seem to fit the corners exactly right. I'm still not real sure why it didn't work out right because the corners are square and my table saw was set to exactly 45degrees according to my Starrett square.   At the same time I was trying to decide how to attach the edging because I didn't want any fasteners showing on the finished project.  So after spending an hour or so wracking my brain and test fitting pieces I finally decided I needed a break so I went for a drive to Home Depot to pick up some wasp spray (I found wasps hibernating in the basement window) and to pick up dinner since Leslie and Braden were at Super Fun Night at the Tae Kwon Do center.  

After getting back and eating dinner I decided to abandon the miter plan and just butt the ends square to get the desk done in a (somewhat) reasonable time frame.  I also figured out my method of attacking the edging so it was time to get back to work. 

On the ends about the only way to attach the edging would be with pocket screws so that meant I had to take the backs off the shelves to be able to get my drill into cut them. That was ok because I was planning to take it off to paint anyway, just did it a little sooner than planned.  On the sides I just pre drilled counter sunk holes into the plywood frame. This seemed to hold the edging tight enough so I went with it. 


Otis came down to the shop to assist. He looks like he's ready and willing to help....

But his help turned into laying right in the way as I was trying to work...just like a good shop dog should I guess.  


After I finally got all the edging attached I got out my WoodRiver #4 smoothing plane and flushed the edging to the surface top.  This was a lot of fun.  Probably the most fun thing I've done on this project. It cut the pine like butter.


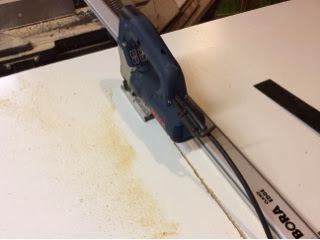
This morning I went downstairs and finished the woodworking by cutting a chamfer on the top edging. 

I used a chisel and file to clean up the inside corner of the desk where the router wouldn't get to. 


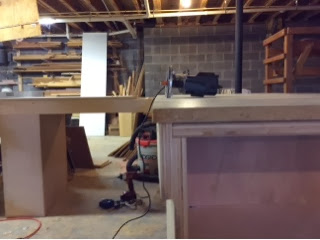
And with that the desk is done, except for the finishing (ie the non fun part).  After looking at the grain pattern of the edging I'm thinking about leaving it natural and fishing with shellac or poly to contrast against the dark brown of the base.  I'll have a few days to ponder that while I get all the saw dust cleaned up fom my last couple of projects...now that's the really not fun part. Here is the before picture.  


I've got just a little bit of work to do....until next time.


Sunday, February 9, 2014

Craft/Computer Desk Day 4

After lunch today I jumped right into trying to determine if the top was going to fit upstairs in one piece.  I had a couple of 8' long 2x4's laying in the basement from some project long ago.  I took those and a couple scrap wood pieces and made a 3'x8' frame to see if the top would make the turn. 


Turns out the 2x4s were just a little twisted so I had fun trying to put the frame together


After all that I managed to get it screwed together in its sad warped shape with some long screws and clamps.  I got Leslie to help me move it upstairs and we were able to get to to fit without too much trouble so I think we should be ok for the top to fit upstairs. 

Did I mention that this desk makes for a great assembly table?  I think that might be my next shop project...I didn't realize how handy a large flat surface could be.  

Anyway, now back to our regularly scheduled programming. 

I took my Kreg pocket screw jig over to the frame and cut several more pocket screw holes to fasten the top to the frame. 
I clamped the long top to the frame so it wouldn't move while I put in a few screws to hold down the top while I flush time the sides. After screwing it down I pulled the clamps and got my flush trim bit setup in my router.  To test the cut is started on the long back side that will be up against a wall and not visible.  After making this short test cut I realized that a) I was going to need a dust mask and 2) I needed to figure out a way to attach my dust collection hose to pull as much dust as possible out of the air.


I made a quick trip to the store to get the mask. Right beside the mask they had pocket hole screws on clearance so I got the last box of 500 1-1/4" coarse Kreg screws. I was running low so it worked out perfectly.  I also got the wood for the trim while I was there.  Originally I had planned to use poplar, but it was about 4x the price of pine, so I went with pine. Since it's going to be painted it doesn't really matter much. 
I pulled my dust collector over to the other side of my shop and used some cable ties to try to hold my dust collection hose to the router.  It seemed like it might work so I got suited up for battle.  

The cable ties held the hose just fine, however, it didn't work that great since most of the dust was below the table as you can see below. I think I need to upgrade the dust collection in my shop too.  
I got the top trimmed but realized that I had two spots I wasn't going to be able to reach where the side frame attached.  


I could either take all apart and rout those 2 spots or try to clean it up by hand. So after looking around the shop I got out my block plane, a micro plane rasp and a chisel and was able to make quick work of the particleboard.  I really could have used a rabbet block plane or shoulder plane to make the cut in one pass, but having neither I made it work.  Something to add to my Amazon wishlist.


I used my jigsaw and Bora straightedge clamp to cut the top of the short side to rough length.

Again I needed to clamp the top down while I secured it with screws but this time I also needed clamp it along the length so I used the ol'clamp trick and put two clamps together to make on long clamp.  In this friction the top is right at 10 ft total so it's not practical to have clamps that long.  This worked great. 
After screwing it down I finished off the flush trimming and now it looks like a desk.  

Next shop day I will cut the trim, clean up the shop and get this beast ready for paint. I also have another project that is just about ready to be stained so I will probably do the finishing on both pieces at the same time. I'll have more on that project later, but seeing as I started it before my son was born over 8 years ago it's not going anywhere. That will be another post for another day.